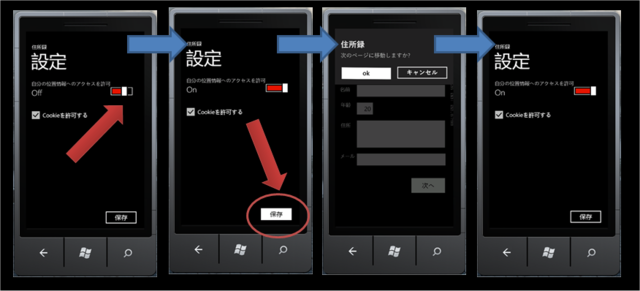
設定画面 その4
あとは必要なイベント発生時にこれらのコマンドを明示的に実行すればOKだ。
次は実際の画面と組合わせて処理を完成させてみよう。
今回は今までの仕上げとして、実際に画面を用意して設定値をロード/セーブしてみよう。
設定画面
動作確認するだけなので、以下のような単純な画面を用意した。(Settings.xaml)

使用しているコントロールはToggleSwitchとCheckBoxであり、両方ともブール値を使用する。
ViewModel
Viewのコントロールのうち、永続化の対象となる上記二つのコントロール(ToggleSwitchとCheckBox)と双方向バインドするプロパティを持ったViewModel (SettingsViewModel.cs)を作成する。
-
- SettingsViewModel.cs
    [PropertyDecl("UseGeoLocation", typeof(bool))]
    [PropertyDecl("UseCookie", typeof(bool))]
    public partial class SettingsViewModel
    {}
以前に書いたようにViewModelのプロパティはT4 Templateにより自動生成が可能になっているので今回もそれを使う。
T4 Text TemplateによるViewModelクラスの生成 その5
T4 Text TemplateによるViewModelクラスの生成 その4
このクラスで言うとUseGeoLocation、UseCookieの二つのプロパティの入出力を付加した同クラスのパーシャルタイプをテンプレートにより生成する。
-
- SettingsViewModel_Generated.cs (テンプレートから自動生成される)
    /// <summary>
    /// このクラスはE:\.Mandarine\Mandarine\CodeGen\ViewModelGenerate.ttにより
    /// 2011/10/25 17:58:21に自動生成されました。
    /// このファイルをエディタで直接編集しないでください
    /// </summary>
    public partial class SettingsViewModel: Mandarine.MVVM.ViewModel.ViewModel
    {
        #region

        private bool _useGeoLocation ;
        public bool UseGeoLocation
        {
            get { return _useGeoLocation ; }
            set
            {
                if ( _useGeoLocation == value )
                    return;
                _useGeoLocation = value;
                NotifyPropertyChanged(() => UseGeoLocation);
            }
        }

        #endregion
        #region

        private bool _useCookie ;
        public bool UseCookie
        {
            get { return _useCookie ; }
            set
            {
                if ( _useCookie == value )
                    return;
                _useCookie = value;
                NotifyPropertyChanged(() => UseCookie);
            }
        }

        #endregion
    }
この際、MVVMとしてViewModel内にコマンドをプロパティとして保持するやり方が一般的だが、今回はXAML側でインスタンスを管理することにする。
Command
コマンドは前回書いたように、AppSettingsCommandを基底クラスとしたロード/セーブコマンドに対応したクラスを実装する。
-
- AppSettingsLoadCommand.cs (ロード用)
    public class AppSettingsLoadCommand : AppSettingsCommand<SettingsViewModel>
    {
        public AppSettingsLoadCommand()
            : base(null)
        {
            _execute = vm =>
            {
                vm.UseGeoLocation = GetValueOrDefault("UseGeoLocation", false);
                vm.UseCookie = GetValueOrDefault("UseCookie", true);
            };
        }
    }
-
- AppSettingsSaveCommand.cs (セーブ用)
    public class AppSettingsSaveCommand : AppSettingsCommand<SettingsViewModel>
    {
        public AppSettingsSaveCommand()
            : base(null)
        {
            _execute = vm =>
            {
                AddOrUpdateValue("UseGeoLocation", vm.UseGeoLocation);
                AddOrUpdateValue("UseCookie", vm.UseCookie);
                Save();
            };
        }
    }
それぞれ画面に対応した二つの設定値をIsoratedStorageのApplicationSettings領域にロード/セーブするように実装しただけである。
これで残りのView、ViewModelが用意出来たので、あとはそれらをBlend4のビヘイビアでバインド/ワイアリングしてやるだけだ。
SettingsViewModelのバインド
SettingsViewModelはデータバインド対象として画面全体のDataContextとして設定すれば、あとは各コントロールから直接バインドできる。
-
- Settings.xaml (抜粋)
    <phone:PhoneApplicationPage.DataContext>
        <v:SettingsViewModel />
    </phone:PhoneApplicationPage.DataContext>
    :
    :
    <toolkit:ToggleSwitch x:Name="useGeoLocation" Header="自分の位置情報へのアクセスを許可" HorizontalAlignment="Left" IsChecked="{Binding UseGeoLocation, Mode=TwoWay}"/>
    <CheckBox x:Name="useCookie" HorizontalAlignment="Left" IsChecked="{Binding UseCookie, Mode=TwoWay}" Content="Cookieを許可する"/>
それぞれSettingsViewModelのUseGeoLocationとUseCookieを双方向でバインドしている。これでViewとViewModelの同名のプロパティが同期する。
AppSettingsLoadCommand/AppSettingsSaveCommandのバインド
コマンドのバインドだが、データのロードは画面がロードされた際に一度行えば良いだろう。データのセーブはボタンから明示的に行う。
なので、それぞれのコマンドを実行するためのビヘイビアを該当のコントロールの適切なイベントにバインドすれば良い。
-
- Settings.xaml (抜粋)
    <phone:PhoneApplicationPage.Resources>
        <Command:AppSettingsLoadCommand x:Key="cmdLoad"/>
        <Command:AppSettingsSaveCommand x:Key="cmdSave"/>
    </phone:PhoneApplicationPage.Resources>
    :
    :
Resources要素によりこの画面のリソースとしてXAMLパーサー側でロード用コマンドとセーブ用コマンドを生成する。
ロード用コマンドはページのLoadイベントに対してトリガを設定してInvokeCommandActionビヘイビアを設定する。
    <i:Interaction.Triggers>
        <i:EventTrigger>
            <i:InvokeCommandAction
                Command="{StaticResource cmdLoad}"
                CommandParameter="{Binding}"/>
        </i:EventTrigger>
    </i:Interaction.Triggers>
    :
これでページのロード時にロード用コマンドが起動されて、IsolatedStorageから保存されたデータがロードされる。
一方セーブ用のコマンドは明示的に実行したい。ボタンは数少ない直接コマンドをバインドできるコントロールなので、コマンドの実行を直接ボタンにバインドする(タップ時にコマンドが実行される)
    <Button x:Name="btnSave" Content="保存" HorizontalAlignment="Right" VerticalAlignment="Bottom" Margin="0,0,8,8" Width="148"
      Command="{StaticResource cmdSave}"
      CommandParameter="{Binding}"/>
    :
これでOK。実行してみよう。
