iOSプログラミングの注意点 その3 (UITextUnBlinderを作成する)
iOSで面倒なことの一つにソフトウェアキーボードの制御がある。
Androidの場合、殆ど制御が要らないように上手くできているのに比べてiOSのそれは出たら出っぱなしでそのままでは閉じることも出来ず、他のコントロールを隠してしまってホームに戻ることしか出来なくなったりする。
以前にも一度書いたことがあるが、この典型的な問題はテーブルビュー(UITableView)上に入力フィールドを配置することを前提にすれば、割と簡単に回避することが出来る。
UITableViewController.keyboardDidShow
@implementation UITableViewController
{
    UITableViewCell* currentCell;
}
-(void)keyboardDidShow:(NSNotification*)note
{
    if (!currentCell)
    {
        UIView* v = [[self tableView] bb_findFirstResponder];
        if (v)
        {
            currentCell = (UITableViewCell*) [[v superview] superview];
        }
    }
    if (currentCell)
    {
        [[self tableView] scrollToRowAtIndexPath:[[self tableView]
                                indexPathForCell:currentCell]
                                atScrollPosition:UITableViewScrollPositionTop
                                        animated:YES];
    }
    currentCell = nil;
}
- (UIView*)bb_findFirstResponder
{
    if ([self isFirstResponder]) {
        return self;
    }
    for (UIView* subView in [self subviews])
    {
        if ([subView isFirstResponder]){
            return subView;
        }
        UIView* view =[subView bb_findFirstResponder];
        if (view)
        {
            return view;
        }
    }
    return nil;
}
レスポンダを基準にテーブルビューの行に対してscrollToRowAtIndexPathで強制的にスクロールする。しかし、この方法は当然ながらUITableViewをレイアウトとして使用している場合に限られる。
ということでコンテナとなるビューがUIViewであっても同様に入力フィールドが隠れないように、自動的に位置を変えるUITextUnBlinderを書いてみた。
UITextUnBlinderはUIViewControllerのカテゴリとして書く。
UIViewController+BBUITextUnBlinder.h
#import <UIKit/UIKit.h>
@interface UIViewController (BBUITextUnBlinder)
@property float keyboardHeight;
-(void)bb_registerTextUnBlinder;
-(void)bb_unRegisterTextUnBlinder;
@end
UIViewController+BBUITextUnBlinder.m
#import <objc/runtime.h>
#import "UIViewController+BBUITextUnBlinder.h"

#define TAGKEY_KEYBOARD_HEIGHT @"keyboardHeight_key"

@implementation UIViewController (BBUITextUnBlinder)
@dynamic keyboardHeight;

-(void)bb_setViewMovedUpAboveKeyboard:(BOOL)movedUp keyboardHeight:(float)keyboardHeight
{
    UIView* targetView = self.view;
    [UIView beginAnimations:nil context:NULL];
    [UIView setAnimationDuration:0.3];

    CGRect rect = targetView.frame;
    int offset = (keyboardHeight);

    if (movedUp)
    {
        //キーボードの高さの分、ビューを上に引っ張り上げ延ばす
        rect.origin.y -= offset;
        rect.size.height += offset;
    }
    else
    {
        //元に戻す
        rect.origin.y += offset;
        rect.size.height -= offset;
    }
    targetView.frame = rect;

    [UIView commitAnimations];
}
-(void)bb_registerTextUnBlinder
{
    // キーボード表示時の通知開始
    [[NSNotificationCenter defaultCenter] addObserver:self
                                             selector:@selector(bb_keyboardDidShow:)
                                                 name:UIKeyboardDidShowNotification
                                               object:nil];

    [[NSNotificationCenter defaultCenter] addObserver:self
                                             selector:@selector(bb_keyboardWillHide:)
                                                 name:UIKeyboardWillHideNotification
                                               object:nil];
}
-(void)bb_unRegisterTextUnBlinder
{
    // キーボード表示通知の終了
    [[NSNotificationCenter defaultCenter]
     removeObserver:self name:UIKeyboardDidShowNotification object:nil];

    [[NSNotificationCenter defaultCenter]
     removeObserver:self name:UIKeyboardWillHideNotification object:nil];
}

-(void)bb_keyboardDidShow:(NSNotification*)note
{
    CGSize kbSize = [[note.userInfo
                      objectForKey:UIKeyboardFrameBeginUserInfoKey] CGRectValue].size;
    if ( self.keyboardHeight != 0 )
    {
        [self bb_setViewMovedUpAboveKeyboard:NO keyboardHeight:self.keyboardHeight];
        self.keyboardHeight = 0;
    }
    self.keyboardHeight = kbSize.height;
    [self bb_setViewMovedUpAboveKeyboard:YES keyboardHeight:self.keyboardHeight];
}

-(void)bb_keyboardWillHide:(NSNotification*)note
{
    if ( self.keyboardHeight == 0 )
    {
        CGSize kbSize = [[note.userInfo
                          objectForKey:UIKeyboardFrameBeginUserInfoKey] CGRectValue].size;
        self.keyboardHeight = kbSize.height;
    }
    [self bb_setViewMovedUpAboveKeyboard:NO keyboardHeight:self.keyboardHeight];
    self.keyboardHeight = 0;
}

- (float)keyboardHeight
{
    NSNumber* num =  (NSNumber*)(objc_getAssociatedObject(self, TAGKEY_KEYBOARD_HEIGHT));
    return [num floatValue];
}
- (void)setKeyboardHeight:(float)delta
{
    objc_setAssociatedObject(self, TAGKEY_KEYBOARD_HEIGHT, [[NSNumber alloc] initWithFloat:delta], OBJC_ASSOCIATION_RETAIN_NONATOMIC );
}

@end
使い方は簡単で、UIViewController+BBUITextUnBlinder.hをインポートしたUIViewController中でUnBlinderを使いたい所から
[self bb_registerTextUnBlinder];
UnBlinderが必要なくなったら
[self bb_unRegisterTextUnBlinder];
で登録を解除してやれば良い。
やっていることはコードを見れば分かるだろう。特殊なのはインスタンス毎に最後に表示されたキーボードの高さを退避する必要があるが、カテゴリはその特性上プロパティを持てないため、AssociatedObjectを利用して動的なプロパティを実装している。
これは日本語環境の場合、キーボードが複数あってそれを切り替える可能性があるからだ。keyboardHeightプロパティは、その種類によって高さが違うキーボードが切り替わる度に、iOSがUIKeyboardDidShowを通知してきた場合にその高さを記憶しておくために使う。
実行結果

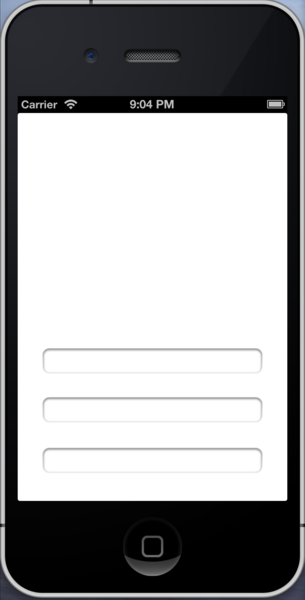
このようにわざわざ画面の下の方にUITextFieldを配置しておく。

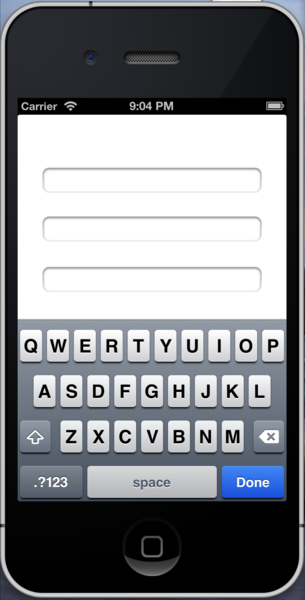
UITextFieldをレスポンダにすると、このようにビュー全体が上にせり上がる。
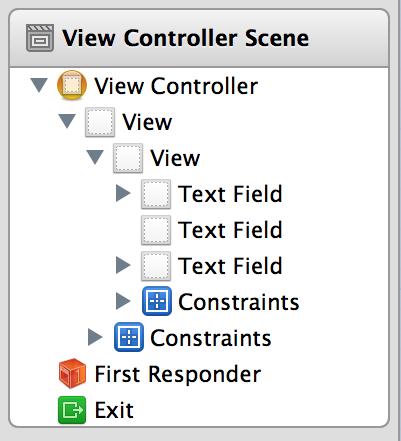
なお、UITextUnBlinderを使う場合一つだけ制限がある。ルートのビューはサイズと位置を変更することができないのでサイズと位置を変更するための、他のコントロールのコンテナとなるビュー (UIView)を配置することが必要だ。

このようにrootViewの下にViewをコンテナとして配置している。
ビューがせり上がる量=ソフトウェアキーボードの高さな訳だが、これだと上手い具合に入力フィールドが見える所に位置が合わない場合もあるだろう。その場合、bb_setViewMovedUpAboveKeyboard内部か追加の動的プロパティを使って調整する必要があるだろう。